
Node-RED is an easy way for FileMaker developers to integrate webhooks and microservices with FileMaker apps.
There are many videos and tutorials about how to use Node-RED with FileMaker. This tutorial is about setting up a production-ready Node-RED instance from zero on an AWS instance that will cost as little as $2.50US/month (or free with Free Tier).
These instructions assume you are on a Mac, but almost everything will be identical on Windows.
NOTE: If you do not wish to use AWS, you can still use this tutorial to configure Node-RED on Ubuntu 24.04. Once you have Ubuntu running and you are connected in Terminal, skip down to where it says “Run Updates…” and continue from there.
Launching an instance
Create an AWS account or login at console.aws.amazon.com
Open the EC2 service and click “Launch instance”
Find the Ubuntu Server 24.04 AMI. I recommend the Arm version because Arm instances are lower cost, faster (at least in theory), and use less energy (at least in theory)! If you’re looking to take advantage of Free Tier, you will need to choose x86.

The smallest instance for Arm is the t4g.nano, with 0.5GiB of memory. This is adequate for testing. You may wish to choose a larger instance for production, but you can also change the instance size later.
A t4g.nano costs $0.0042US per hour in US East, and each subsequent instance size is roughly double the cost of the last.
Later, you can purchase a reservation to obtain a discount when committing to 1 or 3 years. a t4g.nano for 1 year costs $1.90US per month or $22US per year when you splurge for the whole year up front!
On the next screen “Configure Instance Details”, the default selections should be fine.
On Step 4: Add Storage, you will find the minimum storage for this AMI is 8GB. This is adequate. By the time you finish this tutorial you will still have 70% of your storage available.
Change the volume type from the default General Purpose SSD (gp2) to General Purpose SSD (gp3), which is almost certainly going to be cheaper and at least as performant in this use case.
“General Purpose SSD (gp3)” is $0.08US per GB per month in US East. Therefore, your storage cost should be $0.64US per month (note: storage costs do not stop if you stop your on-demand/hourly instance, though they are billed by the second, so you can delete the volumes to stop charges at any time).
If you’re adding up the costs, you may also have to consider data transfer charges of up to $0.09US per GB on data sent from your EC2 server to the internet, but the first GB is free, and you probably won’t exceed that for this use case.
On Step 5 you can add tags to help you keep track of your AWS services. I recommend clicking “Add name tag” and give your instance a name.
In Step 6, create a security group that allows you to connect to your instance with SSH, HTTP, and HTTPS. For added security, restrict SSH access to your IP address only.
Launch your instance! Select an existing key pair or add a new one. If you add a new one, a file will be downloaded to your computer. Save it in a safe place and guard it like a password. You need it to connect to your instance over SSH.
After launching the instance, click the instance ID (on the confirmation screen) to open the instance in the Instances list (or just navigate to the Instances list in the EC2 service). In a few seconds, the Instance state should show “Running”.

Click your instance to select it, and you should find the “Public IPv4 address” in the panel below”.
Open your DNS editor for your domain (usually your domain registrar or hosting provider), and add an A record to point a new subdomain at this IP address.
For example, in Namecheap’s Advanced DNS Editor, an A record pointing at noderedtest.yourdomain.com looks like this:

NOTE: In this tutorial, we did not setup an Elastic IP. If you terminate your instance, you will not be able to start a new instance with the same IP address unless you provisioned the IP as an Elastic IP. It may be safer not to use an elastic IP address, because they can accrue charges (about $3.60US/month) if you terminate your instance and keep an unused Elastic IP reserved. Besides, updating your DNS is easy.
Connecting to the instance with SSH
Open Terminal
If you downloaded a new SSH key, update the file permissions with
chmod 400 /Users/jason/TestKeyPair.pem
Then connect to the instance with
ssh -i /Users/jason/TestKeyPair.pem ubuntu@your.domain.com
Replace the path with the path to your SSH key (you can drag the file to the Terminal to write the path) and replace your.domain.com with your new domain.
The first time you connect, you will have to say “yes” to add the host as a known host.
Run updates… (this may take a couple minutes)
sudo apt update && sudo apt upgrade -y
Let’s configure a firewall…
Since we’ve configured a restrictive security group in AWS, you could argue this is unnecessary, but it can’t hurt (that is, it can’t hurt unless you miss a step and prevent yourself from connecting to your instance, in which case you may need to start over).
sudo ufw allow ssh
sudo ufw allow http
sudo ufw allow https
sudo ufw enable
Answer “y” when prompted. Check status with
sudo ufw status
Fail2ban
Fail2ban watches your server logs and detects certain types of attacks, then updates your firewall to ban the attacker temporarily or permanently.
sudo apt install fail2ban -y
sudo cp /etc/fail2ban/jail.conf /etc/fail2ban/jail.local
sudo service fail2ban restart
Install Node.js and Node-RED!
Run the following to install Node.js and Node-RED.
bash <(curl -sL https://github.com/node-red/linux-installers/releases/latest/download/update-nodejs-and-nodered-deb)
Answer yes, then no. This will take a few minutes…
Node-RED Settings File initialization
After installation completes, the Node-RED Settings File initialization tool will run. Use the arrow keys to select from multiple options and press Enter to select an option. When prompted for a value, input the text and press Enter.
Enter a name for your flows file. Hit Enter to use the default flows.json
Do you want to setup user security? YES
Select a username
Select a password
User permissions: full access
Add another user? NO
Do you want to enable the Projects feature? NO
Provide a passphrase to encrypt your credentials file. This will encrypt anything you input into a field that is designated as a credential, such as your credentials to connect to FileMaker Server.
Select a theme for the editor – DEFAULT
Select the text editor component – DEFAULT
Allow function nodes to load external modules? DEFAULT (or no, it won’t matter for most uses and can be changed)
Run Node-RED as a service
We want Node-RED to run automatically when the server starts:
sudo systemctl enable nodered.service
Exposing Node-RED to the internet
NGINX allows us to setup a reverse proxy so that Node-RED can be reached on port 80 (http) or 443 (https). Otherwise, Node-RED can only be reached on port 1880.
sudo apt install nginx -y
systemctl status nginx
NGINX should be running. If you go to http://your.domain.com you should see a Welcome to NGINX page.
sudo nano /etc/nginx/sites-available/your.domain.com
Be sure to replace your.domain.com with your own domain!
The nano text editor should open. Now paste the following after replacing the domain name on line 7:
#proxy for node-red @ port :1880
server {
  listen 80;
  listen [::]:80;
  server_name your.domain.com;

  location = /robots.txt {
    add_header  Content-Type  text/plain;
    return 200 "User-agent: *\nDisallow: /\n";
  }

  location / {
    proxy_pass http://127.0.0.1:1880;

    #Defines the HTTP protocol version for proxying
    #by default it it set to 1.0.
    #For Websockets and keepalive connections you
    #need to use the version 1.1
    proxy_http_version  1.1;

    #Sets conditions under which the response will
    #not be taken from a cache.
    proxy_cache_bypass  $http_upgrade;

    #These header fields are required if your
    #application is using Websockets
    proxy_set_header Upgrade $http_upgrade;
    proxy_set_header Connection "upgrade";

    #The $host variable in the following order of
    #precedence contains:
    #hostname from the request line,
    #or hostname from the Host request header field
    #or the server name matching a request.
    proxy_set_header Host $host;

    #Forwards the real visitor remote IP address to
    #the proxied server
    proxy_set_header X-Real-IP $remote_addr;

    #A list containing the IP addresses of every
    #server the client has been proxied through
    proxy_set_header X-Forwarded-For $proxy_add_x_forwarded_for;

    #When used inside an HTTPS server block,
    #each HTTP response from the proxied server
    #is rewritten to HTTPS.
    proxy_set_header X-Forwarded-Proto $scheme;

    #Defines the original host requested by the client.
    proxy_set_header X-Forwarded-Host $host;

    #Defines the original port requested by the client.
    proxy_set_header X-Forwarded-Port $server_port;
  }
}
To save the file, CTRL-O, to exit CTRL-X. Then, create a link to your file from the sites-enabled directory.
sudo ln -s /etc/nginx/sites-available/your.domain.com /etc/nginx/sites-enabled/
Make sure you use YOUR domain and leave a space after it (before /etc)
sudo nano /etc/nginx/nginx.conf
Uncomment the line:
server_names_hash_bucket_size 64;
Save and exit like before.
sudo nginx -t
You want to see “syntax is ok” and “test is successful”!
sudo systemctl restart nginx
You should now be able to reach your Node-RED editor in a web browser (at http://your.domain.com)
If you see 502 Bad Gateway (was common on older Ubuntu versions but no longer), reboot with:
sudo reboot
Let’s Encrypt!
Before continuing, you will need to reconnect to your instance in the terminal using ssh (see above).
sudo snap install --beta certbot --classic
sudo certbot --nginx -d your.domain.com
Be sure to use your domain!
You will be asked for your email address, then answer Y to agree to the terms, then Y or N to share your email with the Electronic Frontier Foundation, and then you should expect to be congratulated by certbot!
You should now be able to reach your server in a browser with https.
Certbot will automatically update certificates before they expire. Check that certbot is working.
sudo certbot renew --dry-run
Change your credentials
The initial admin username & password was configured during install. Use these instructions to change it.
node-red admin hash-pw
You will be asked to supply a password, then the hashed version of your password will be displayed. Copy it.
nano $HOME/.node-red/settings.js
Replace the password with the hash you just created.
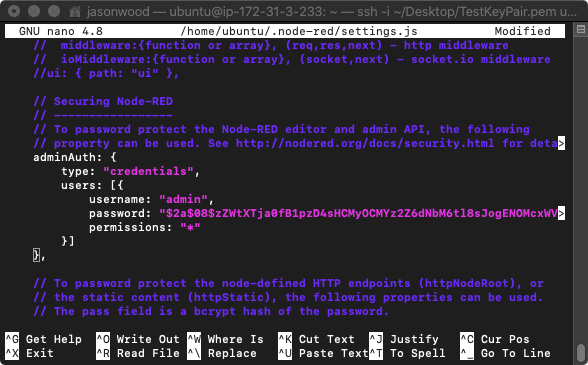
Save changes and exit, then run
sudo node-red-restart
The Node-RED web page should now be prompting you to login. The username is admin unless you changed that too!
NOTE: The username and password are both case sensitive.
Fail2Ban
Now let’s configure Fail2Ban to block some potential attacks.
The user’s IP should be banned if they receive more than 10 response codes of type 404 (not found), 444 (no response), 403 (forbidden, such as incorrect password), or 400 (bad request). Repetitive requests returning these codes suggest penetration testing or brute force attacks.
sudo nano /etc/fail2ban/filter.d/nginx-4xx.conf
Insert the following text, then save and exit:
[Definition]
failregex = ^<HOST>.*"(GET|POST).*" (404|444|403|400) .*$
ignoreregex =
Then…
sudo nano /etc/fail2ban/jail.local
Insert the following at the end.
[nginx-4xx]
enabled = true
port = http,https
logpath = %(nginx_access_log)s
maxretry = 10
Save and exit, then…
sudo service fail2ban restart
Checking that the rule is working…
sudo fail2ban-client status nginx-4xx
You can check the Fail2ban logs:
sudo cat /var/log/fail2ban.log | grep Ban
Or the NGINX logs:
sudo cat /var/log/nginx/access.log
Let’s up our game a little more. The default ban time is 10 minutes. Let’s keep increasing it for repeat offenders.
sudo nano /etc/fail2ban/jail.local
And uncomment the following lines:
bantime.increment = true
bantime.factor = 1
bantime.formula = ban.Time * (1<<(ban.Count if ban.Count<20 else 20)) * banFactor
Save and exit then…
sudo service fail2ban restart
Install node-red-contrib-filemaker
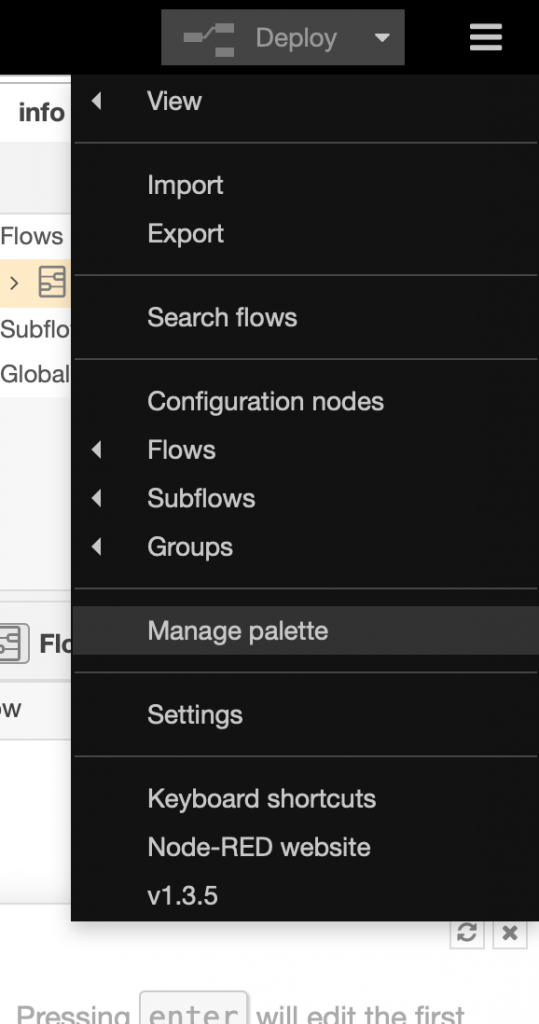
Open the hamburger menu and select “Manage palette”
Go to the install tab and find node-red-contrib-filemaker, and install it. This will take a minute or two.
You should now see the FileMaker nodes in the list at the left.
Keep your server up-to-date
From time to time, run sudo apt update && sudo apt upgrade -y
Working with the Node-RED service
The following commands are provided to work with the service:
node-red-start– this starts the Node-RED service and displays its log output. PressingCtrl-Cor closing the window does not stop the service; it keeps running in the backgroundnode-red-stop– this stops the Node-RED servicenode-red-restart– this stops and restarts the Node-RED servicenode-red-log– this displays the log output of the service
Acknowledgements, next steps & additional resources
These instructions are largely based on this post in the Node-RED forum by @meeki007. Thanks @meeki007!
The commands provided for working with the Node-RED service were copied directly from here: https://nodered.org/docs/getting-started/raspberrypi
Jason demonstrated Node-RED at SOFA in January, 2022. Watch now!
node-red-contrib-filemaker was created by Lui de la Parra. Thanks Lui!
Luidog / node-red-contrib-filemaker on GitHub
DevCon 2019 INT08 (YouTube) FileMaker of Things: APIs and IoT Using Node Red with Lui de la Parra
DIGFM July 2020 (YouTube) Node-RED Alert – Flows on Fire!
Change Log
2021-07-30 – Two instructions to edit jail.conf were updated to refer to jail.local instead. This was an error. jail.local is a duplicate of jail.conf which we created earlier in the tutorial. It is recommended to edit jail.local only, as jail.conf could be replaced when updating Fail2Ban. Anything set in jail.local overrides the same setting in jail.conf.
2022-04-22 – Added link to SOFA presentation.
2024-11-29 – The installation script now includes a tool to initialize the settings.js file and set the administrator credentials. The article was updated to reflect this. Commands for working with the service were added near the bottom for quick reference.
2024-11-30 – Replaced Ubuntu 20.04 with 24.04.
2025-12-16 – Removed the suggestion to install build-essential and git, as it is probably not necessary and you can install these later if you need them. Changed the order of questions in the settings file creation script to match the latest script. Rephrased the note about possible need to restart after NGINX configuration, as this problem is no longer common.
2026-01-10 – Updated the Node-RED installation script URL.
Great well-written article! Thank you!
Brilliant as always Jason. Install went perfectly, big fan of fail2ban so thanks for adding that.